
| 일 | 월 | 화 | 수 | 목 | 금 | 토 |
|---|---|---|---|---|---|---|
| 1 | 2 | 3 | ||||
| 4 | 5 | 6 | 7 | 8 | 9 | 10 |
| 11 | 12 | 13 | 14 | 15 | 16 | 17 |
| 18 | 19 | 20 | 21 | 22 | 23 | 24 |
| 25 | 26 | 27 | 28 | 29 | 30 | 31 |
- 조축회
- KeyBert
- 데이터넥스트레벨챌린지
- Optimizer
- Tableu
- 포아송분포
- 블루아카이브 토픽모델링
- 토픽 모델링
- 데이터리안
- 자연어 모델
- geocoding
- 코사인 유사도
- 트위치
- 개체명 인식
- CTM
- 문맥을 반영한 토픽모델링
- 붕괴 스타레일
- 블루 아카이브
- 원신
- 데벨챌
- Roberta
- LDA
- 다항분포
- 구글 스토어 리뷰
- NLP
- 클래스 분류
- BERTopic
- 옵티마이저
- SBERT
- 피파온라인 API
- Today
- Total
분석하고싶은코코
NLP - BERT 실전 활용(1) 본문
BERT에 대해서 알아봤으니 BERT를 활용해서 다양한 자연어처리 문제들을 처리해보는 과정을 포스팅해보겠습니다.
이번에 포스팅에서는 다음 4가지 문제에 대해서 진행해보겠습니다. 4개를 모두 다루면 글이 길어지니 이번 포스팅에서는 클래스 분류와 개체명 인식 두 가지를 진행해보겠습니다.
- 클래스 분류
- 개체명 인식
- 기계 독해(Q&A)
- 간단한 챗봇 구현
1) 클래스 분류
우선 마지막 출력층을 직접 작성해보는 작업을 진행해서 어떻게 동작하는지에 대해서 알아보고 이후에 BERT에서 지원해주는 모듈을 사용해 출력층을 구현해 보겠습니다. 사용할 사전훈련된 모델은 'klue/bert-base'모델입니다.
1-1) 클래스 분류 - 직접 구현하기
import pandas as pd
import numpy as np
import urllib.request
import os
from tqdm import tqdm
import tensorflow as tf
from transformers import BertTokenizer, TFBertModel

# 네이버 리뷰 데이터 가져오기
urllib.request.urlretrieve("https://raw.githubusercontent.com/e9t/nsmc/master/ratings_train.txt", filename="ratings_train.txt")
urllib.request.urlretrieve("https://raw.githubusercontent.com/e9t/nsmc/master/ratings_test.txt", filename="ratings_test.txt")

train_data = pd.read_table('ratings_train.txt')
test_data = pd.read_table('ratings_test.txt')

# 결측값 제거
train_data.drop_duplicates(subset=['document'], inplace=True)
train_data = train_data.dropna(how='any')
test_data = test_data.dropna(how='any')

# 사전 훈련된 토크나이저 불러오기
tokenizer = BertTokenizer.from_pretrained('klue/bert-base')
여기까지는 사용할 데이터 토크나이저를 가져오는 작업을 진행했고 이제 직접 입력을 위한 임베딩 3개의 층을 직접 만들어보겠습니다. 사실 이부분은 토크나이저를 통해서 쉽게 구현이 가능하지만 어떻게 만들어지는지에 대해서 직접 구현을 통해서 이해해보고자 이 부분도 같이 진행하였습니다. 토크나이저를 통한 데이터 처리는 아래에서 사용해보겠습니다.
def convert_data_tokenizer(examples, labels, max_seq_len, tokenizer):

    # input_ids : 실제 데이터를 토크나이저에 맞는 정수 인코딩 리스트
    # attention_masks : bert에 사용할 어텐션 마스크
    # token_type_ids : 세그먼트 인코딩
    # data_labels : 결과값
    input_ids, attention_masks, token_type_ids, data_labels = [], [], [], []

    for example, label in tqdm(zip(examples, labels), total = len(examples)):

        input_id = tokenizer.encode(example, max_length= max_seq_len, pad_to_max_length = True)

        pad_count = input_id.count(tokenizer.pad_token_id) # 정수 인코딩된 값들에서 PAD토큰 값인 0을 카운팅
        attention_mask = [1] * (max_seq_len- pad_count) + [0] * pad_count # 실제 값이 있는 곳은 1 아닌곳은 0으로 어텐션 마스크 생성

        token_type_id = [0] * max_seq_len # 세그먼트 인코딩은 문장이 쌍으로 들어오는 것이 아니라 하나의 문장만 들어오므로 0으로 전부 인코딩

        input_ids.append(input_id)
        attention_masks.append(attention_mask)
        token_type_ids.append(token_type_id)
        data_labels.append(label)

    input_ids = np.array(input_ids, dtype=int)
    attention_masks = np.array(attention_masks, dtype = int)
    token_type_ids = np.array(token_type_ids, dtype = int)
    data_labels = np.asarray(data_labels, dtype=np.int32)

    return (input_ids, attention_masks, token_type_ids), data_labels


train_X, train_y = convert_data_tokenizer(train_data['document'], train_data['label'], 128, tokenizer)
test_X, test_y = convert_data_tokenizer(test_data['document'], test_data['label'], 128, tokenizer)
구조는 간단합니다. 데이터에서 문장과 라벨 뭉텅이를 받아오고 이를 함수 내에서 풀어서 하나씩 인코딩 작업을 진행해주고 다시 패킹해주는 작업을 하는 겁니다. 이후는 모델을 불러와서 모델을 구성해보겠습니다.
class TFBertForSequenceClassification(tf.keras.Model):
    def __init__(self, model_name):
        super(TFBertForSequenceClassification, self).__init__()
        self.bert = TFBertModel.from_pretrained(model_name, from_pt=True) # 클래스가 선언됐을때 사용될 버트 모델 이름을 입력받는데 이를 초기화 해줍니다

        # 분류 모델의 마지막 출력층을 추가해줍니다.
        self.classifier = tf.keras.layers.Dense(1,
                                        kernel_initializer=tf.keras.
                                            initializers.TruncatedNormal
                                            (0.02),
                                        activation='sigmoid',
                                        name='classifier')

    def call(self, inputs):
        input_ids, attention_mask, token_type_ids = inputs
        outputs = self.bert(input_ids=input_ids, attention_mask=attention_mask,
            token_type_ids=token_type_ids)
        cls_token = outputs[1]
        prediction = self.classifier(cls_token)
        return prediction


 #TPU작동을 위한 코드 시작부분
resolver = tf.distribute.cluster_resolver.TPUClusterResolver(tpu='grpc://' + os.environ['COLAB_TPU_ADDR'])
tf.config.experimental_connect_to_cluster(resolver)
tf.tpu.experimental.initialize_tpu_system(resolver)
strategy = tf.distribute.TPUStrategy(resolver)

with strategy.scope(): # TPU사용하지 않는다면 여기까지 주석 처리 필요.
  model = TFBertForSequenceClassification("klue/bert-base")
  optimizer = tf.keras.optimizers.Adam(learning_rate=5e-5)
  loss = tf.keras.losses.BinaryCrossentropy()
  model.compile(optimizer=optimizer, loss=loss, metrics = ['accuracy'])

# 모델 훈련
# fit호출시 위에서 선언한 call함수를 통해서 예측값을 얻고 실제값과 비교하여 훈련을 진행합니다.
model.fit(train_X, train_y, epochs=2, batch_size=64, validation_split=0.2)

results = model.evaluate(test_X, test_y, batch_size=1024)
print("test loss, test acc: ", results)
훈련된 모델을 통해서 긍정과 부정에 대한 분류 결과를 확인해보겠습니다.
def sentiment_predict(new_sentence):
  max_seq_len = 128
  input_id = tokenizer.encode(new_sentence, max_length=max_seq_len,
         pad_to_max_length=True)

  padding_count = input_id.count(tokenizer.pad_token_id)
  attention_mask = [1] * (max_seq_len - padding_count) + [0] * padding_count
  token_type_id = [0] * max_seq_len

  input_ids = np.array([input_id])
  attention_masks = np.array([attention_mask])
  token_type_ids = np.array([token_type_id])

  encoded_input = [input_ids, attention_masks, token_type_ids]
  score = model.predict(encoded_input)[0][0]

  if(score > 0.5):
    print("{:.2f}% 확 률 로 긍 정 리 뷰 입 니 다.\n".format(score * 100))
  else:
    print("{:.2f}% 확 률 로 부 정 리 뷰 입 니 다.\n".format((1 - score) * 100))

sentiment_predict("오펜하이머 꿀잼입니다! 꼭 보세요!!")
1/1 [==============================] - 1s 597ms/step
99.56% 확 률 로 긍 정 리 뷰 입 니 다.
1-2) 클래스 분류 - 출력층이 추가된 클래스 모델 활용하기
위에서 직접 구현한것보다는 간소하게 작성되어 동일한 작업을 진행해주는 코드입니다. TFBertForSequenceClassification은 출력층이 부착이 되어 있는 클래스 모델입니다. TextClassificationPipeline은 직접 최종 결과에서 [CLS]토큰에 접근해 결과를 가져올 필요없이 라벨에 대한 결과값을 받을 수 있는 모듈입니다.
위 코드와 다른점을 하나씩 보겠습니다. 우선 입력 데이터를 위한 토크나이징 작업에서 위에서는 3개의 임베딩 층을 직접 구현하는 작업을 거쳤는데 여기에서는 불러온 토크나이저를 통해 바로 만들었습니다. 이번에는 BertTokenizerFast를 통해서 진행했는데 기본 토크나이저모듈보다 속도가 빠르지만 성능에 문제를 줄 수 있으니 사용에 유의하여야 합니다. 직접 구현한 3개의 층으로 데이터 변환을 진행했습니다. truncation옵션을 통해서 입력 데이터로 들어온 최대 길이에 맞추어 인코딩을 진행했고 패딩옵션까지 주었습니다. tokens(실제 데이터 토큰), ids(정수인코딩), type_ids(세그먼티 인코딩)을 통해서 결과값을 확인할 수 있습니다. 이후 TFBertForSequenceClassification를 통해서 모델을 불러왔고 컴파일 작업에서 model.hf_compute_loss는 TFBertForSequenceClassification에서 초기 설정이 분류를 위한 이진분류크로스엔트로피 손실함수로 지정되어있는 것을 그대로 지정해준 것입니다. 추가적으로 더 작성된 것은 사전종료 코드인데 monitor 옵션을 통해서 사전종료할 값을 설정하고 변화가 크게 없을때 학습을 끝까지 하지 않고 종료해주는 코드입니다. 이후는 모델에 훈련을 시켜주고 결과를 보는 코드는 위와 동일합니다.
import tensorflow as tf
from transformers import BertTokenizerFast, TFBertForSequenceClassification, TextClassificationPipeline
from tensorflow.keras.callbacks import EarlyStopping

# 결측값 처리
train_data.drop_duplicates(subset=['document'], inplace=True)
train_data = train_data.dropna(how='any')
test_data = test_data.dropna(how='any')

# 사용 데이터
X_train_list = train_data['document'].tolist()
X_test_list = test_data['document'].tolist()
y_train = train_data['label'].tolist()
y_test = test_data['label'].tolist()

# 입력을 위한 임베딩 데이터
tokenizer = BertTokenizerFast.from_pretrained("klue/bert-base")
X_train = tokenizer(X_train_list, truncation=True, padding=True)
X_test = tokenizer(X_test_list, truncation=True, padding=True)
# 결과값 확인법 : X_train[0].tokens

train_dataset = tf.data.Dataset.from_tensor_slices(( dict(X_train), y_train))
val_dataset = tf.data.Dataset.from_tensor_slices(( dict(X_test), y_test))
optimizer = tf.keras.optimizers.Adam(learning_rate=5e-5)

# 출력층이 부착된 클래스 모델 불러오기
model = TFBertForSequenceClassification.from_pretrained("klue/bert-base", num_labels=2, from_pt=True)
model.compile(optimizer=optimizer, loss=model.hf_compute_loss, metrics=['accuracy'])

# 사전종료를 위한 설정
early_stopping = EarlyStopping(
    monitor="val_accuracy",
    min_delta=0.001,
    patience=2)

model.fit( train_dataset.shuffle(10000).batch(32), epochs=2, batch_size=32,
          validation_data = val_dataset.shuffle(10000).batch(32), callbacks = [early_stopping])


# TextClassificationPipeline - 라벨별 스코어를 보여주는 모듈
text_classifier = TextClassificationPipeline(
    tokenizer = tokenizer,
    model = model,
    framework='tf',
    return_all_scores=True)

text_classifier('오펜하미어 호불호 진짜 심함. 난 솔직히 노잼이었음')[0]

# 결과
[{'label': 'LABEL_0', 'score': 0.746947169303894},
{'label': 'LABEL_1', 'score': 0.25305283069610596}]


# 모델, 토크나이저 저장
model.save_pretrained('naver_cf/bert-base')
tokenizer.save_pretrained('naver_cf/bert-base')
+ 다중 클래스 분류
예제로 진행한 문제는 이진 분류 문제였지만 다중 클래스 분류 문제도 풀 수 있습니다. 다중 클래스 분류 문제 중 가장 많은 예시로 카카오 브레인팀에서 공개한 한국어 벤치마크 데이터셋을 예로 수정되는 부분만 언급하고 넘어가겠습니다.
data : https://github.com/kakaobrain/KorNLUDatasets
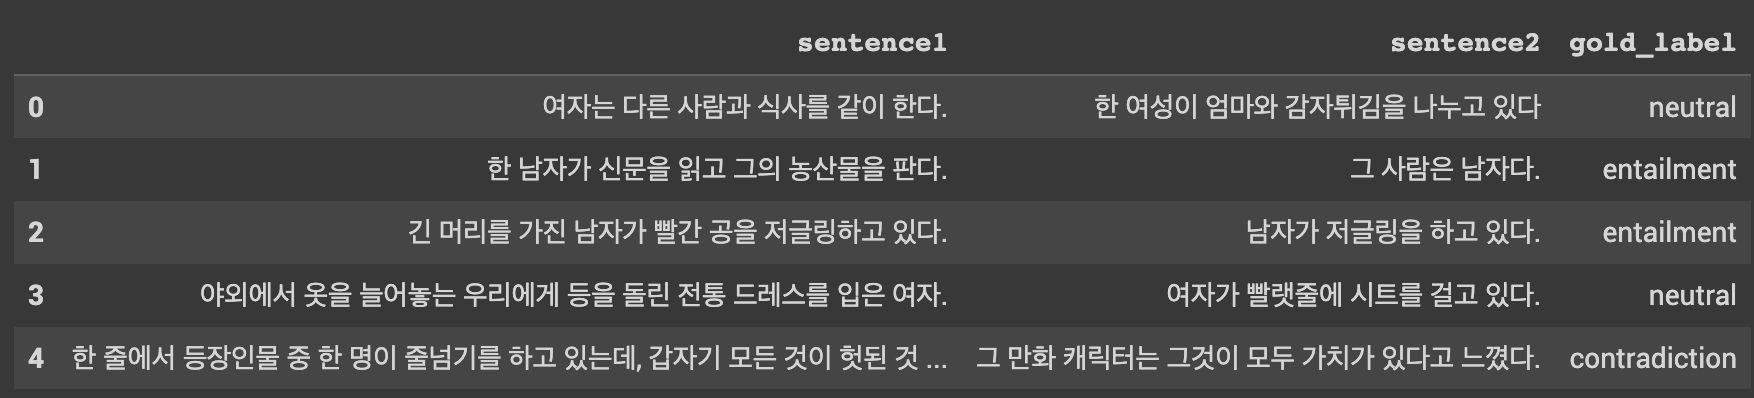
이번 데이터는 이전 데이터와 다르게 문장 2개로 구성되고 하나의 레이블을 갖고 있습니다. 그래서 토크나이징 하는 방법이 조금 다릅니다. 토크나이저를 불러오는 과정까지는 똑같지만 단순히 토크나이저로 데이터를 보내는 것이 아니라 encode_plus를 이용해서 인코딩이 가능합니다. 그런데 주의할점은 기존 토크나이저 호출할때처럼 리스트 형태로 넣지 못해서 따로 작업하고 다시 형태를 맞춰줘야합니다. 그래서 1-1에서 작업했던 것처럼 진행해주면 됩니다. 결과에서 다른점은 세그먼트 인코딩에서 기존에는 모두 0이었지만 이제는 0과 1 두 가지로 구성된다는 것입니다. 이후에는 결과로 나오는 라벨이 몇 개인지에 설정해주는 부분을 제외하고는 모두 동일하게 진행됩니다.
# 두개의 문장을 합친 입력 데이터 생성
tokenizer.encode_plus(sent1, sent2, max_length=128, pad_to_max_length=True)

# 수동 코드에서 수정되는 부분
self.classifier = tf.keras.layers.Dense(num_labels, kernel_initializer=tf.keras.initializers.TruncatedNormal(0.02), activation='softmax', name='classifier')

# 출력층이 부착되어있는 모듈 사용시
model = TFBertForSequenceClassification.from_pretrained("klue/bert-base", num_labels=3, from_pt=True)
2) 개체명 인식
BERT를 통해서 개체명 인식도 가능합니다. 그런데 전처리 해줘야할 부분이 조금 다릅니다. 이유는 개체명 인식을 위한 BIO태깅에 대해서 먼저 이해할 필요가 있습니다.
2-0) BIO태깅
BIO태깅은 기본적으로 토큰나이징 작업이 이뤄진 토큰들에 대해서 개체명 인식을 위한 태깅 작업을 의미합니다. 간단한 예시로 이해하면 쉽게 이해하실 수 있습니다. 다음은 자연어처리라는 단어가 토크나이저를 통해서 토큰화가 진행됐는데 분리를 한글자씩 분리시켰다고 가정합니다. 그러면 다음과 같이 BIO태깅이 진행됩니다. 자연처러리는 개체명 인식이라는 범주에서 ORG(organization) 개체명으로 분류됩니다. 즉 [ 자연어처리 - ORG ] 이렇게 매칭이 되어 있는 것입니다. 이제 자연어처리라는 단어를 분리시키면 [ 자연어, 처리 ] 로 분리 됐을 것입니다. 그렇다면 전부 ORG로 태깅을 해주면 컴퓨터 입장에서는 각각 하나가 ORG 개체명으로 인식해버리고 이후 '자연어 처리'라는 하나의 뭉치로 인식하지 못하여 모델에 악영향을 주게 됩니다. 따라서 구분지어줄 표현이 필요한데 그게 'B'와 'I'입니다. B는 단어가 토큰으로 분리됐을때 시작하는 토큰에게 부여가 되고 이후 토큰들에게는 I가 부여되어 아래와 같은 표현으로 토크나이저와 라벨링이 진행됩니다. 남은 'O'는 개체가 아닌 토큰들에 대해서 전부 'O' 라벨을 부여합니다. 이게 BIO태깅 내용의 전부입니다.
자연어 처리

자연어 - B-ORG
처리 - I-ORG
2-1) BERT를 이용한 개체명 인식(BERt-NER)
데이터는 이전 Bi-LSTM으로 개체명인식을 진행했던 데이터를 그대로 사용하겠습니다.
import pandas as pd
import numpy as np
import os
from tqdm import tqdm
from transformers import shape_list, BertTokenizer, TFBertModel
from tensorflow.keras.callbacks import EarlyStopping
from tensorflow.keras.preprocessing.sequence import pad_sequences
from seqeval.metrics import f1_score, classification_report
import tensorflow as tf
import urllib.request

urllib.request.urlretrieve("https://raw.githubusercontent.com/ukairia777/tensorflow-nlp-tutorial/main/18.%20Fine-tuning%20BERT%20(Cls%2C%20NER%2C%20NLI)/dataset/ner_train_data.csv", filename="ner_train_data.csv")
urllib.request.urlretrieve("https://raw.githubusercontent.com/ukairia777/tensorflow-nlp-tutorial/main/18.%20Fine-tuning%20BERT%20(Cls%2C%20NER%2C%20NLI)/dataset/ner_test_data.csv", filename="ner_test_data.csv")
urllib.request.urlretrieve("https://raw.githubusercontent.com/ukairia777/tensorflow-nlp-tutorial/main/18.%20Fine-tuning%20BERT%20(Cls%2C%20NER%2C%20NLI)/dataset/ner_label.txt", filename="ner_label.txt")

train_ner_df = pd.read_csv("ner_train_data.csv")
test_ner_df = pd.read_csv("ner_test_data.csv")
labels = [label.strip() for label in open('ner_label.txt', 'r', encoding='utf-8 ')]

# 문장과 라벨분리
train_data_sentence = [sent.split() for sent in train_ner_df['Sentence'].values ]
test_data_sentence = [sent.split() for sent in test_ner_df['Sentence'].values]
train_data_label = [tag.split() for tag in train_ner_df['Tag'].values]
test_data_label = [tag.split() for tag in test_ner_df['Tag'].values]

# 표현확인을 위한 사전
tag_to_index = {tag: index for index, tag in enumerate(labels)}
index_to_tag = {index: tag for index, tag in enumerate(labels)}
tag_size = len(tag_to_index)

train_ner_df.head()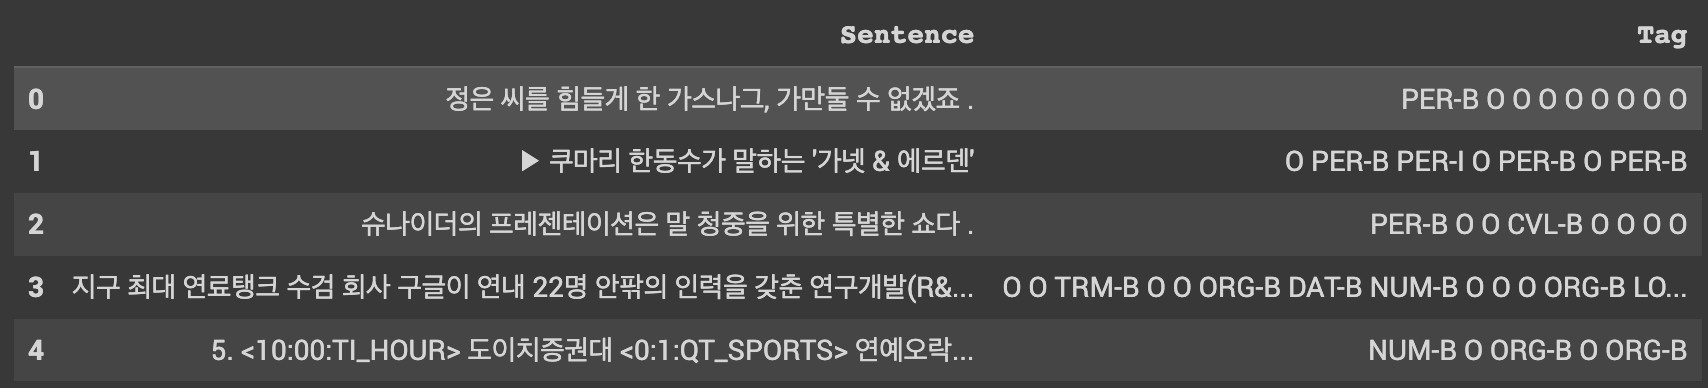
데이터는 다음과 같습니다. 이미 BIO태깅 작업은 끝이 나있고 이를 띄어쓰기로 구분해두었습니다. 이를 훈련을 위해 사용하기 위한 데이터로 다듬는 과정이 위의 과정입니다. 이제 기본적인 틀을 만들었다면 토크나어저를 통해서 입력 데이터 폼에 맞추어 보겠습니다. 우선 토크나이징 과정에 대해서 먼저 설명하고 코드를 보면 쉽게 이해하실 수 있을 겁니다. 기본적인 결과 틀은 똑같습니다. 3개의 입력 정보(실제 데이터 정수 인코딩, 어텐션 마스크, 세그먼트 인코딩)와 라벨링 정보입니다. 그런데 개체명 인식에서 이 토크나이징 과정에서 다른점은 하나의 개체를 인식할 필요가 있다는 조건이 들어갔다는 것입니다. 그래서 토큰나이징된 단어를 모두 동일한 라벨을 부여할 수 없다는 것입니다. 그래서 이번에는 'O'를 활용할 것입니다. 개체명 단어의 시작 부분만 개체 라벨링을 부여하고 나머지 부분에는 'O'를 라벨링을 부여하는 작업을 진행합니다.
아래 함수는 문장 뭉치 리스트를 받아서 하나씩 작업을 진행하는데 뭉치 리스트 안의 하나의 문장 역시 리스트 형태로 데이터가 담겨있도록 위에서 처리해줬기 때문에 하나의 단어씩 가져와서 작업하는 이중 반복분 형태가 됩니다. 개체명 인식에는 보통 사용자가 갖고 있는 데이터가 기본적으로 어떤 개체명 범주를 갖고 있는지 정의되어 있습니다. 이 번 코드에서는 labels라는 변수에 숫자와 개체명이 매칭된 정보를 불러왔고 이를 활용하기 위해 위에서 'tag_to_index', 'index_to_tag'에 분리시켜 저장해두어 사용하였습니다. 토큰화를 진행하는데 주의해야할 것이 있습니다. 입력 데이터로 쓰기 위해서는 특수 토큰인 [CLS], [SEP]토큰이 들어가야합니다. 이를 위해서 2자리 확보가 필수 적이므로 문장을 토큰화 작업했을때 설정한 최대 길이보다 길경우 2자리를 강제로 마련하는 부분을 추가하였습니다. 이후 토큰화된 데이터의 맨 앞에는 [CLS]토큰을 맨 뒤에는 [SEP] 토큰을 부여합니다. 이후 과정은 기존에 진행했던 입력 데이터 형태를 만드는 과정과 동일합니다.
# 토크나이저
tokenizer = BertTokenizer.from_pretrained("klue/bert-base")

#
def convert_to_features(datas, labels, max_seq_len, tokenizer, pad_token_id_for_segment=0, pad_token_id_for_label=-100):

  input_ids, attention_masks, token_type_ids, data_labels = [], [], [], [] # 최종 반환 리스트
  pad_token_id = tokenizer.pad_token_id # 특수 토큰을 사용해야 하므로 가져옵니다.
  cls_token, sep_token = tokenizer.cls_token, tokenizer.sep_token

  for data, label in tqdm(zip(datas, labels), total=len(datas)):
    tokens = []
    labels_ids = []

    for one_word, label_token in zip(data, label):
      subword_tokens = tokenizer.tokenize(one_word)
      tokens.extend(subword_tokens)
      labels_ids.extend([tag_to_index[label_token]]+ [pad_token_id_for_label] * (len(subword_tokens) - 1))

    special_tokens_count = 2
    if len(tokens) > max_seq_len - special_tokens_count:
        tokens = tokens[:(max_seq_len - special_tokens_count)]
        labels_ids = labels_ids[:(max_seq_len - special_tokens_count)]

    tokens += [sep_token]
    labels_ids += [pad_token_id_for_label]

    tokens = [cls_token] + tokens
    labels_ids = [pad_token_id_for_label] + labels_ids

    input_id = tokenizer.convert_tokens_to_ids(tokens)

    attention_mask = [1] * len(input_id)
    padding_count = max_seq_len - len(input_id)

    input_id = input_id + ([pad_token_id] * padding_count)
    attention_mask = attention_mask + ([0] * padding_count)

    token_type_id = [pad_token_id_for_segment] * max_seq_len


    label = labels_ids + ([pad_token_id_for_label] * padding_count)

    assert len(input_id) == max_seq_len, "Error with input length {} vs {}".format(len(input_id), max_seq_len)
    assert len(attention_mask) == max_seq_len, "Error with attention masklength {} vs {}".format(len(attention_mask), max_seq_len)
    assert len(token_type_id) == max_seq_len, "Error with token type length{} vs {}".format(len(token_type_id), max_seq_len)
    assert len(label) == max_seq_len, "Error with labels length {} vs {}".format(len(label), max_seq_len)

    input_ids.append(input_id)
    attention_masks.append(attention_mask)
    token_type_ids.append(token_type_id)
    data_labels.append(label)

  input_ids = np.array(input_ids, dtype=int)
  attention_masks = np.array(attention_masks, dtype=int)
  token_type_ids = np.array(token_type_ids, dtype=int)
  data_labels = np.asarray(data_labels, dtype=np.int32)

  return (input_ids, attention_masks, token_type_ids), data_labels

X_train, y_train = convert_to_features(train_data_sentence, train_data_label, max_seq_len=128, tokenizer=tokenizer)
X_test, y_test = convert_to_features(test_data_sentence, test_data_label, max_seq_len=128, tokenizer=tokenizer)
이제 모델링을 할 차례인데 이전 긍정/부정 리뷰 분류와 다른점은 다중 분류인데 결과가 Many-to-One이 아니라 Many-to-Many로 나온다는 점입니다. 또 다른점 하나가 있는데 패딩 토큰을 -100으로 따로 지정해주었기 때문에 이를 손실 함수에게 알려주어야할 필요가 있습니다. 그래서 compute_loss 손실함수를 튜닝하고 이를 모델 컴파일에 적용해주었습니다. 또한 손실함수에서 하나 더 살펴볼 부분은 선택한 손실함수가 기존의 분류 손실함수였던 'CategoricalCrossentropy'이 아니라 'SparseCategoricalCrossentropy'라는 점입니다. 해당 함수는 모델의 마지막 출력층에서 softmax 활성화 함수를 적용하지 않았을때를 고려하여 오차를 계산해주는 손실함수 입니다. 이후 모델링은 앞서 진행한 과정과 동일하며 저는 과적합에 대한 모니터링을 정확도로 두었지만 보다 정확한 모니터링을 원한다면 F1-스코어를 통해서 할 수 있습니다. 이는 링크를 통해서 확인하시면 가능합니다.
class TFBertForTokenClassification(tf.keras.Model):
  def __init__(self, model_name, num_labels):
    super(TFBertForTokenClassification, self).__init__()
    self.bert = TFBertModel.from_pretrained(model_name, from_pt=True)

    # Dense 옵션에 activation='softmax'를 추가하면 마지막 층에 활성화 함수 softmax를 적용한 결과값이 나옵니다.
    self.classifier = tf.keras.layers.Dense(num_labels, kernel_initializer=tf.keras. initializers.TruncatedNormal(0.02), name='classifier')


  def call(self, inputs):
    input_ids, attention_mask, token_type_ids = inputs
    outputs = self.bert(input_ids=input_ids, attention_mask=attention_mask,
        token_type_ids=token_type_ids)

    all_output = outputs[0] # 전체 시퀀스에 대해서 분류해야 하므로 outputs[0]
    prediction = self.classifier(all_output)
    return prediction

def compute_loss(labels, logits):
  loss_fn = tf.keras.losses.SparseCategoricalCrossentropy(from_logits=True, reduction=tf.keras.losses.Reduction.NONE)
  active_loss = tf.reshape(labels, (-1,)) != -100

  reduced_logits = tf.boolean_mask(tf.reshape(logits, (-1, shape_list(logits)[2])), active_loss)
  labels = tf.boolean_mask(tf.reshape(labels, (-1,)), active_loss)

  return loss_fn(labels, reduced_logits)

#TPU작동을 위한 코드
resolver = tf.distribute.cluster_resolver.TPUClusterResolver(tpu='grpc://' + os.environ['COLAB_TPU_ADDR'])
tf.config.experimental_connect_to_cluster(resolver)
tf.tpu.experimental.initialize_tpu_system(resolver)
strategy = tf.distribute.experimental.TPUStrategy(resolver)

with strategy.scope():
  model = TFBertForTokenClassification("klue/bert-base", num_labels=tag_size)
  optimizer = tf.keras.optimizers.Adam(learning_rate=5e-5)
  model.compile(optimizer=optimizer, loss=compute_loss, metrics = ['accuracy'])

model.fit(X_train, y_train, epochs=3, batch_size=32, validation_split=0.2)
이제 Pre-trained 모델에 내가 원하는 목적에 맞게끔 데이터를 추가적으로 훈련시키고 출력층까지 만드는 파인튜닝 과정을 진행했습니다. 이제 예측을 위한 준비를 해야합니다. 준비라고 해봐야 크게 다를 것은 없고 그냥 우리가 알고있는 텍스트의 형태를 모델이 이해하는 형태로 전달하고 그 전달을 통해 얻은 결과를 우리가 이해할 수 있는 상태로 출력해주는 과정을 구현해주면 되는 것입니다. 'convert_to_features_prediction'의 경우 라벨이 없는 데이터에 대한 예측이기 때문에 기존 훈련데이터를 변경해주던 함수에서 라벨에 대한 매개변수는 사라졌습니다. 이후 작업은 라벨에 대한 정보를 넣는 'label_masks'를 제외하고 모두 동일합니다. label_masks에는 토크나이징 됐을때 단어의 첫번째 위치를 기억하도록 마스킹되어있습니다.
아래 코드의 전체적은 과정은 아래와 같습니다.
[ 사용자로부터 텍스트를 입력 받음 -> 토크나이징(convert_to_features_prediction) -> 예측(model.predict) -> 예측 결과중 첫번째 토큰에 라벨링된 결과만 pred_list에 저장 -> 토크나이징 전 띄어쓰기를 통해 분리된 단어와 pred_list와 매칭(둘이 길이는 같음) -> 문장을 구성하는 단어를 하나의 리스트에 저장해서 결고 반환 ]
def convert_to_features_prediction(datas, max_seq_len, tokenizer, pad_token_id_for_segment=0, pad_token_id_for_label=-100):

  input_ids, attention_masks, token_type_ids, label_masks = [], [], [], [] # 최종 반환 리스트
  pad_token_id = tokenizer.pad_token_id
  cls_token, sep_token = tokenizer.cls_token, tokenizer.sep_token

  for data, label in tqdm(zip(datas, labels), total=len(datas)):
    tokens = []
    label_mask = []

    for one_word in data:
      subword_tokens = tokenizer.tokenize(one_word)
      tokens.extend(subword_tokens)
      label_mask.extend([0]+ [pad_token_id_for_label] * (len(subword_tokens) - 1))

    special_tokens_count = 2
    if len(tokens) > max_seq_len - special_tokens_count:
        tokens = tokens[:(max_seq_len - special_tokens_count)]
        label_mask = label_mask[:(max_seq_len - special_tokens_count)]

    tokens += [sep_token]
    label_mask += [pad_token_id_for_label]

    tokens = [cls_token] + tokens
    label_mask = [pad_token_id_for_label] + label_mask

    input_id = tokenizer.convert_tokens_to_ids(tokens)

    attention_mask = [1] * len(input_id)
    padding_count = max_seq_len - len(input_id)

    input_id = input_id + ([pad_token_id] * padding_count)
    attention_mask = attention_mask + ([0] * padding_count)

    token_type_id = [pad_token_id_for_segment] * max_seq_len


    label_mask = label_mask + ([pad_token_id_for_label] * padding_count)

    assert len(input_id) == max_seq_len, "Error with input length {} vs {}".format(len(input_id), max_seq_len)
    assert len(attention_mask) == max_seq_len, "Error with attention masklength {} vs {}".format(len(attention_mask), max_seq_len)
    assert len(token_type_id) == max_seq_len, "Error with token type length{} vs {}".format(len(token_type_id), max_seq_len)
    assert len(label_mask) == max_seq_len, "Error with labels length {} vs {}".format(len(label_mask), max_seq_len)

    input_ids.append(input_id)
    attention_masks.append(attention_mask)
    token_type_ids.append(token_type_id)
    label_masks.append(label_mask)

  input_ids = np.array(input_ids, dtype=int)
  attention_masks = np.array(attention_masks, dtype=int)
  token_type_ids = np.array(token_type_ids, dtype=int)
  label_masks = np.asarray(label_masks, dtype=np.int32)

  return (input_ids, attention_masks, token_type_ids), label_masks


def ner_prediction(examples, max_seq_len, tokenizer):
  examples = [sent.split() for sent in examples]
  X_pred, label_masks = convert_to_features_prediction(examples, max_seq_len=128, tokenizer=tokenizer)
  y_predicted = model.predict(X_pred)
  y_predicted = np.argmax(y_predicted, axis = 2)
  pred_list = []
  result_list = []
  for i in range(0, len(label_masks)):
    pred_tag = []
    for label_index, pred_index in zip(label_masks[i], y_predicted[i]):
      if label_index != -100:
        pred_tag.append(index_to_tag[pred_index])
        pred_list.append(pred_tag)

  for example, pred in zip(examples, pred_list):
    one_sample_result = []
    for one_word, label_token in zip(example, pred):
      one_sample_result.append((one_word, label_token))
    result_list.append(one_sample_result)
  return result_list


sent1='전라도와 경상도 중간에는 화개장터라는 시장이 있습니다.'
sent2='대한민국은 서울에 많은 사람들이 거주하고 있습니다.'

test_samples = [sent1, sent2]
result_list = ner_prediction(test_samples, max_seq_len=128, tokenizer=tokenizer )
result_list
100%|██████████| 2/2 [00:00<00:00, 1027.64it/s]
1/1 [==============================] - 1s 883ms/step
[[('전라도와', 'LOC-B'),
('경상도', 'LOC-B'),
('중간에는', 'O'),
('화개장터라는', 'LOC-B'),
('시장이', 'O'),
('있습니다.', 'O')],
[('대한민국은', 'LOC-B'),
('서울에', 'LOC-B'),
('많은', 'O'),
('사람들이', 'LOC-B'),
('거주하고', 'O'),
('있습니다.', 'O')]]'머신러닝&딥러닝 > NLP' 카테고리의 다른 글
| NLP - SBERT(Sentence-Bert) (0) | 2023.10.05 |
|---|---|
| NLP - BERT 실전 활용(2) (1) | 2023.10.03 |
| NLP - Bert이해하기(2)_트랜스포머(transformer) (1) | 2023.09.29 |
| NLP - Bert이해하기(1)_어텐션 매커니즘(Attention) (0) | 2023.09.29 |
| NLP - 토픽 모델링(LSA, LDA) (0) | 2023.09.26 |


